Independent. Human-Curated. Established 2007.
20 Blogging Mistakes That Kill Traffic, Revenue & Growth in 2026
Key Takeaways
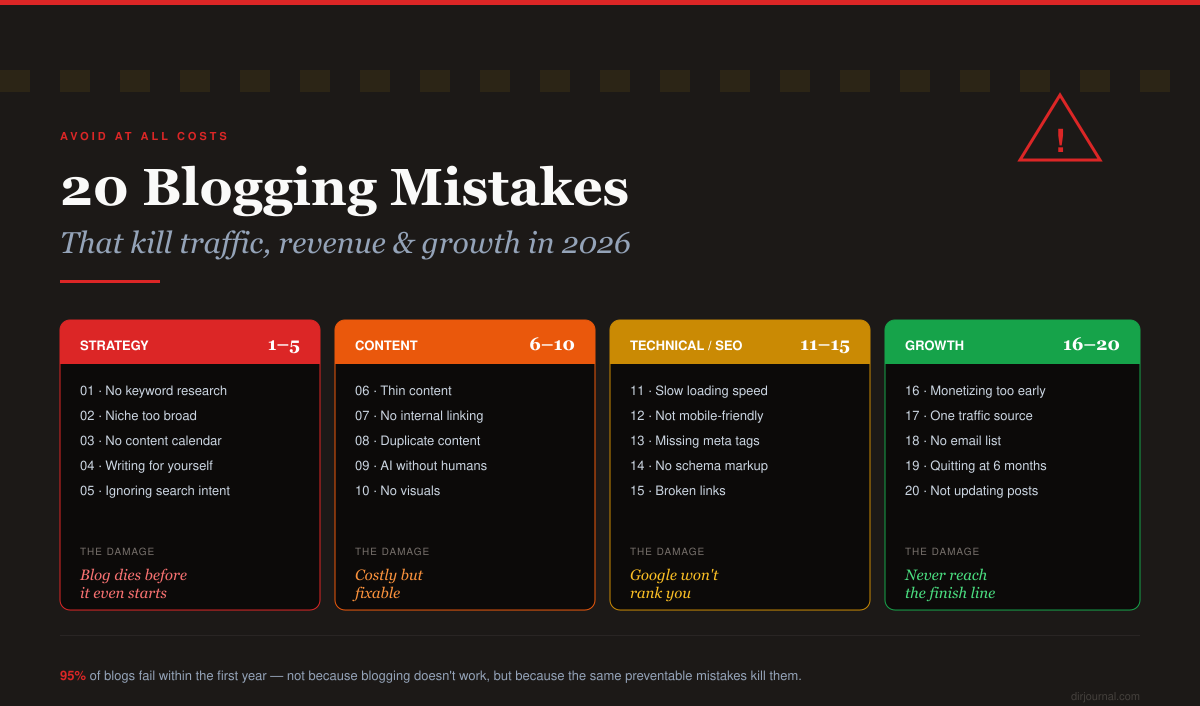
- 95% of blogs fail within the first year — not because blogging doesn't work, but because the same preventable mistakes kill them. This guide covers every one.
- The #1 mistake is publishing without a keyword strategy. Writing what you want to write instead of what people search for is the fastest path to zero traffic. Every post should target a specific, researched keyword.
- Consistency beats quality for the first 50 posts. A "good enough" post published weekly builds more authority than a "perfect" post published monthly. Google rewards freshness and volume from trusted domains.
- AI content without human value-add is the 2026 death trap. Google can detect and devalue purely AI-generated content. The blogs winning in 2026 use AI for research and drafts, then add original insights, data, and expertise that AI can't generate.
DirJournal has published content since 2007 — that's 19 years and thousands of posts. We've made most of these mistakes ourselves and watched thousands of listed businesses make them too. This guide distills what we've learned about what kills blogs and what makes them sustainable.
Strategy Mistakes (These Kill Blogs Before They Start)
Mistake 1: no Keyword Research
The damage: You write 50 posts nobody searches for. Zero organic traffic. Zero growth. The most common reason bloggers quit.
The fix: Before writing anything, verify search demand. Use Google Keyword Planner (free), AnswerThePublic (free), or Ahrefs/Semrush. Target keywords with 100+ monthly searches and competition you can realistically rank for. See our Free SEO Tools guide for the complete toolkit.
Mistake 2: Too Broad a Niche
The damage: A blog about "everything" competes with everyone and establishes authority in nothing. Google rewards topical authority — sites that demonstrate deep expertise in a specific area.
The fix: Narrow your focus. "Marketing" is too broad. "Email marketing for SaaS startups" is a niche. Cover your niche comprehensively before expanding. DirJournal's blog focuses on SEO, business tools, and directory-related topics — not everything under the sun.
Mistake 3: no Content Calendar
The damage: Inconsistent publishing. Bursts of 5 posts in one week, then silence for 2 months. Google and readers both reward consistency.
The fix: Plan content 4-8 weeks ahead. Use a simple spreadsheet: target keyword, working title, publish date, status. One post per week is sustainable for most solo bloggers. The schedule matters more than the frequency.
Mistake 4: Writing for Yourself Instead of Your Audience
The damage: Posts that satisfy your creative urge but don't answer anyone's questions. Blog posts are not diary entries — they're answers to search queries.
The fix: Every post should answer a question someone is actively searching for. Check Google's "People Also Ask" for your topic. Read Reddit and Quora discussions. Write what your audience needs, not what you feel like writing.
Mistake 5: Ignoring Search Intent
The damage: Writing an informational guide for a keyword with commercial intent (or vice versa). If someone searches "best CRM software," they want a comparison — not a 5,000-word essay on what CRM means.
The fix: Google your target keyword and look at what's ranking. If the top results are comparison posts, write a comparison. If they're tutorials, write a tutorial. Match the format that Google already rewards for that query.
Content Mistakes (Fixable but Costly)
Mistake 6: Thin Content
Posts under 800 words rarely rank for competitive keywords. Google's top-ranking results average 1,500-2,500 words for informational queries. This doesn't mean padding — it means covering the topic thoroughly.
Mistake 7: no Internal Linking
New bloggers treat every post as standalone. Experienced bloggers connect every post to related content through internal links. This distributes authority, keeps readers on your site longer, and helps Google understand your content structure. Link every new post to 3-5 related existing posts.
Mistake 8: Duplicate or Cannibalized Content
Publishing multiple posts targeting the same keyword forces them to compete against each other. Google picks one; the others get suppressed. Audit your content for keyword cannibalization — merge overlapping posts into one comprehensive piece. We did exactly this with DirJournal's blog, consolidating 140+ thin posts into focused pillar content.
Mistake 9: AI Content Without Human Value
The 2026 trap: using ChatGPT or Claude to generate entire posts and publishing them unedited. Google's helpful content system detects and devalues content that exists primarily for search engine manipulation without genuine user value. AI is excellent for research, outlines, and first drafts — but the published version must include your original expertise, data, examples, and voice.
Mistake 10: no Visuals
Text walls get skipped. Posts with relevant images, charts, tables, or diagrams earn 94% more views. Use comparison tables (like this guide), screenshots, custom graphics (Canva is free), or stock photos (see our Free Stock Images guide).
Found this useful?
Share this article
Related Resources
Looking for verified service providers? Browse our directory categories below — all human-audited and trusted by decision-makers since 2007.
Technical & SEO Mistakes
Mistake 11: Slow Loading Speed
Every second of load time increases bounce rate by 32%. Compress images, use a CDN, minimize JavaScript, and choose a fast host. Test with PageSpeed Insights.
Mistake 12: Not Mobile-Optimized
65%+ of web traffic is mobile. Google uses mobile-first indexing. If your blog isn't perfectly readable on a phone, you're invisible to the majority of potential readers.
Mistake 13: Missing Meta Titles and Descriptions
Your title tag and meta description are your ad copy in search results. A compelling title can double your click-through rate vs. a generic one. Include your target keyword, keep titles under 60 characters, descriptions under 155 characters.
Mistake 14: no Schema Markup
Article schema, FAQ schema, and BreadcrumbList schema help search engines understand your content and can earn rich snippets in search results. See our Technical SEO guide for implementation details.
Mistake 15: Broken Links
External links rot over time — sites move, pages get deleted. Check for broken links monthly using Screaming Frog (free for 500 URLs) or the Check My Links Chrome extension. Broken links damage user experience and waste crawl budget.
Growth & Monetization Mistakes
Mistake 16: Monetizing Too Early
Plastering ads on a blog with 100 monthly visitors earns pennies while degrading the reading experience. Focus on traffic growth first. Monetize after you hit 10,000+ monthly sessions — that's when ad revenue, affiliate commissions, and sponsorships become meaningful.
Mistake 17: Only One Traffic Source
100% reliance on Google organic is a single point of failure. One algorithm update can cut your traffic 50% overnight. Build an email list (owned audience), maintain social presence, and diversify traffic sources. If Google disappeared tomorrow, could you still reach your audience?
Mistake 18: Not Building an Email List From Day One
Your email list is the only audience you truly own. Social media algorithms change, SEO rankings fluctuate — but your email subscribers are yours. Add a signup form to every post from your first day of blogging. Offer a lead magnet (free guide, template, checklist) in exchange for emails.
Mistake 19: Giving Up at 6 Months
Most successful blogs didn't see significant traffic until months 8-12. SEO is a compounding investment — early posts build domain authority that makes later posts rank faster. The bloggers who succeed are the ones who publish consistently through the "trough of sorrow" when traffic is still low.
Mistake 20: Not Updating Old Content
A 2-year-old post with outdated information loses rankings progressively. The best blogs treat content as a living asset — updating statistics, adding new information, and refreshing posts quarterly. Google rewards recently updated content with a freshness boost. DirJournal's entire blog strategy in 2026 is built around updating and consolidating existing content rather than only publishing new posts.